

Are you looking to start your first ever vegetable garden this winter? Need advice on when and where to start? The team at Aumanns has put together this guide on the best vegetables to plant in winter, around Australia. If you are keen to learn more about the different types of winter plants, we have also provided tips and advice on keeping your garden healthy and flourishing throughout the season. Explore our tips below as well as find out the vegetables to plant in winter.
Advice for Growing Winter Vegetables
No matter how large or small your garden is, you can create a garden to grow winter vegetables. You can plant intensively, which is a way to get big crops in a small space by planting crops close together. For a tiny courtyard or balcony, you can still enjoy fresh, winter vegetables by growing them in pots and choosing vegetables that can be grown up a trellis. You just need to pick spots that get sunlight during the day.
Most vegetables thrive in sunny locations, enjoying as much light as you can supply them with. However, since the sun is lower in the winter months, you need to choose the right spots for your vegetables to ensure they get enough light.
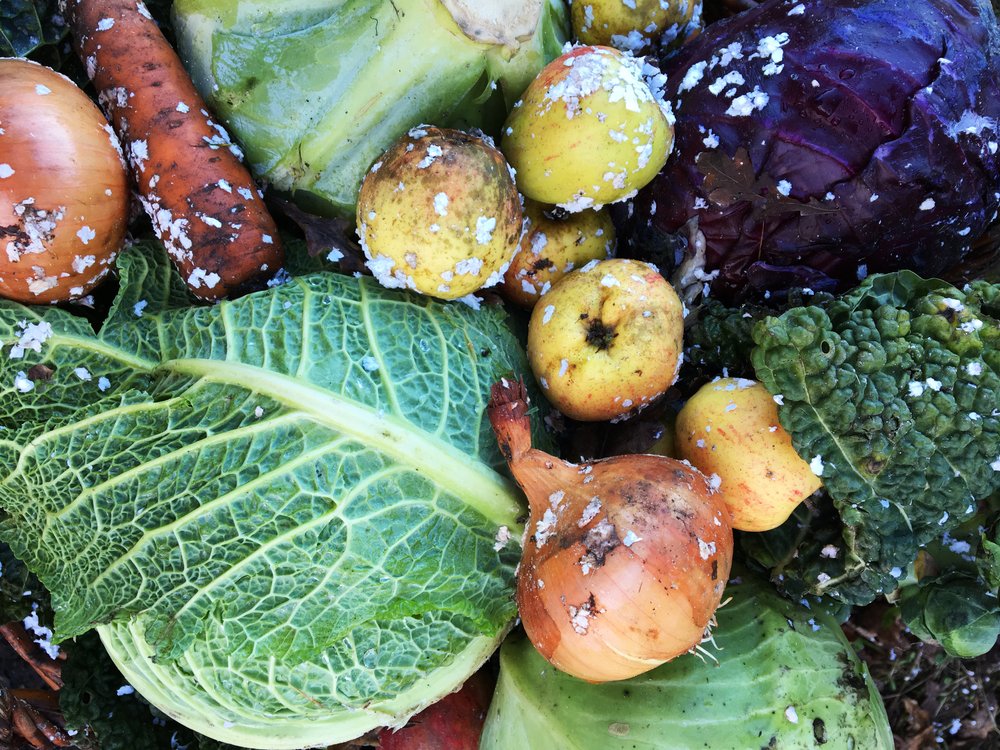
There are also plenty of ways to plant a vegetable garden. Most people follow the tradition of planting in rows, with one variety of vegetable per row. However, this method of planting can be more likely to attract pests. This is why, before we invented pesticides, gardeners (and even some farmers) used a planting method called companion planting.
Companion planting involves planting other plants amongst your vegetables to ward off pests. The most popular companion plants are oregano, sage, basil, and lavender. Not only are these plants good for your vegetable garden, but they are also aesthetically pleasing and make for a beautiful and functional garden.
What Vegetables to Plant in Winter
Experts, like those at Aumanns, recommend that you stagger planting your vegetables throughout the winter months, rather than planting them all at the same time. This means you will have a constant vegetable harvest rather than a huge harvest all at once, that might see vegetables go to waste.
By growing vegetables yourself, you can save money while also having healthy, organic vegetables. And a vegetable garden can be a beautiful and edible part of your garden that takes little work once you get it started. Below we have the 10 vegetables to plant in winter.
1: Broad Beans
Broad beans are an easy to vegetable to plant in winter and a real treat for both winter and spring gardens. They produce a hearty crop of beans after a beautiful show of flowers. Broad beans like a sunny spot with plenty of water. They also require support as they grow, as the plant can fall over in windy conditions.
Prepare your garden bed or pot with soil that has been dug through with compost and well-rotted manure to improve it. Don’t use chicken manure as it’s too high in nitrogen.
Once you’ve prepared your soil, soak your broad bean seeds overnight for about 8-10 hours. Then sow your broad bean seeds directly into your garden or pots at a depth of 50mm once the weather has cooled in June. Broad beans thrive in cool weather so don’t plant too late or your beans won’t have time to produce before the weather gets too warm. Broad beans need quite a lot of water, so keep the soil damp. Rain should do most of the work for you, but remember to give them some extra water during dry spells, especially as the weather starts to warm up.
Pinch growing tips of broad bean plants once the first pods begin to form. This encourages your plant to put all its energy into growing the pods and makes it harder for pests to attack your plants. As the seedlings grow, they will need to be staked or grown up a trellis so that the plant doesn’t topple over. This is usually necessary when the plant is heavy with broad beans. They need little feeding and you should absolutely avoid feeding too much nitrogen. If your plant is looking yellow, then your plant needs a good, balanced organic fertiliser. A good, thicker layer of organic mulch will help keep your soil damp and cool – choose sugar cane and lucerne as the best options.
You can harvest broad beans in different stages. The pods can be harvested when they are young and tender and used like snow peas. Or you can leave the pods a little longer, allowing the peas to swell and be harvested. Pods and peas will ripen from the bottom up. Leave a few pods on the bush to dry and keep them to plant next year.

2: Parsnips
Parsnips are considered the royalty of root vegetables, offering an incredible depth of taste. The roots grow throughout winter, gradually improving in sweetness and flavour. This is because the cold weather gradually turns the starch contained in the parsnips into sugars. Choose a variety that is late to mature and you can fill the infamous “hungry gap” in early spring when the winter vegetables are all eaten but the spring vegetables aren’t ready to harvest yet. This makes them an excellent vegetable to grow in winter.
The fresher the seeds, the better when it comes to parsnips. The seeds will only germinate from material harvested from the previous summer. Plant in late winter, as the soil temperature is starting to warm up towards spring. Parsnips take a long time to grow, taking anywhere between 2 weeks to a month. It can be a little unnerving to stare at a bare patch or planter of soil, but be patient! When planting, space the seeds 3-5cm apart. You can also plant quick-growing radishes between your parsnips. This will not only help mark where the parsnips are but also help identify where weeds are to remove. Your radishes will be ready to harvest at the same time as your parsnips, making for a fantastic double-crop!
Thin the seedlings as they grow, so each plant is about 5-25cm apart. This will allow the parsnips to fill out. Water only during exceptionally dry conditions to encourage the roots to grow deeper in search of moisture. The roots can be lifted, as needed, once the leaves have died back – and it’s all the better if you can wait until the first frosts have tempered the roots. Your parsnips can stay in the ground until they are needed though you should pick before new leaves sprout.
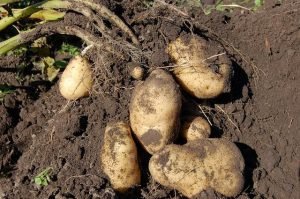
3: Potatoes
Potatoes are one of the most versatile vegetables and one of the most generous plants. They are easy to grow and produce abundant harvests. With full sun, loose fertile soil, and an inch of water a week, they will survive in almost any planting situation. In the best conditions, potato plants can yield 8-10 potatoes. Potatoes can be grown in containers, raised beds, pots, or even in special grow bags. Grow bags, however, will yield smaller harvests than raised beds or containers/pots.
Start with certified, organic, disease-free seed potatoes from a reputable nursery or farm store. When growing in the garden or a raised garden bed, choose a sunny spot with well-drained soil. Dig holes or trenches at least 0-15 cm apart. Plant the seeds with the “eye” or shoots facing up and space at least 35-40cm apart. Then backfill with soil and water well.
As shoots appear, cover them with soil from either side of the hole or trench and water well. This will prevent light from reaching your tubers and stops them from turning green. Continue to mound soil or add sugar cane mulch to the plant as it grows, as well as feeding with a good quality vegetable liquid plant food. Repeat until the mound reaches around 60cm tall.
However, if you’re short on space, you can always grow potatoes in a large pot – even an old bucket (just punch a few holes in the bottom of the bucket for drainage. Half fill your chosen container with soil. Plant seeds as before and cover with 10-5cm of potting mix. As we mentioned above, cover shoots with a potting mix as they appear to prevent light from turning the tuber green. You can also use sugar cane mulch as this helps retain moisture. Feed fortnightly with a vegetable liquid plant food, and continue mounding soil, and water until the mound reaches 60cm.
You can harvest once the plants have flowered and died down. However, if you want some smaller potatoes early on, you can gently dig beneath the plant and extract a few of usable size. You don’t need to collect all your potatoes at once. You can harvest them when you need them, so start by harvesting the largest ones first. If you do harvest all at once, you will need to store your potatoes in a cool, dark, dry place. When replanting your next crop, rotate the position of your planting to prevent the build-up of soil-borne disease.
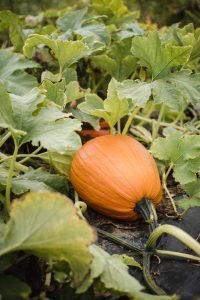
4: Pumpkin
Pumpkins have been growing in North America for almost 5,000 years, making them a traditional winter staple in America. And their amazing tastes and varieties have made them popular around the world in a variety of different dishes.
Pumpkins need a lot of space. Pick a spacious area with full sun and good quality soil that drains well. The best soils are sandy varieties high in organic matter. If your soil is heavy in clay, it is best to mix in compost or aged manure. As we said above, pumpkins need space for their sprawling vines to run – 50-100 square feet per hill. If you have limited space, plant at the edge of the garden and direct your vines across your lawn. You can also grow pumpkins in 5 to 10-gallon buckets – or you could try growing miniature varieties.
Pumpkins are greedy feeders so at least 2 weeks before you plant, mix plenty of compost or aged manure into the soil at the planting site. They also have an extensive root system and respond well to an application of 3-4 pounds of 10-10-10 fertiliser per 100 square feet. There are two ways to plant pumpkin seeds – rows or hills. A hill doesn’t mean the soil has to be mounded. It is simply a spot containing a group of plants or seeds. Hills warm soil quickly so they germinate faster and aid with drainage and pest control. Prepare hills by digging down 12-15 inches, mixing and filling with manure or compost.
Plant 4-8 feet apart, mounded or left level with the rest of the area. Set the seeds 1 inch deep with 4-5 seeds per hill. Keep seeds moist until germination when the plants and 2-3 inches tall, thin to 2-3 plants per hill by snipping off any unwanted plants without disturbing the roots of the remaining plants.
If planting in rows, sow seeds about 6-12 inches apart in rows that are 6-10 feet apart. Once the seedlings are growing, thin to one plant every 18-36 inches.
Pumpkins are extremely thirsty plants and need lots of water. Water 1 inch per week and water deeply, especially when the fruit is growing. When watering try to keep foliage and fruit dry unless it’s a sunny day as dampness will make rot and other diseases more likely. Use row covers to protect plants early in the season to prevent insect problems – but remember to remove covers before flowering to allow for pollination. Bees are essential for pollination so be mindful about using insecticides and fungicides. To attract more bees, try to place a bee house in the garden or grow colourful flowers near the patch.
Be aware that poor light, too much fertiliser, poor weather at bloom time, and reduced bee activity can result in a poor harvest. Add mulch around your pumpkin to keep in the moisture, suppress weeds, and discourage pests. Most small vines and pumpkin varieties can be trained up a trellis. Larger varieties can be trained up a trellis, too, though this is an engineering challenge to support the pumpkins. Pinch off the fuzzy ends of each vine after a few pumpkins have formed. This will stop the plant from growing vines so that the plant focuses its energy on growing the pumpkins. Once the pumpkins begin developing, prune the main and secondary vines. As the pumpkins develop, you should turn them to encourage an even shape.
Harvest pumpkins when they are fully mature as they will keep best this way. Harvest pumpkins on a dry day after the plants have died back and the skins are hard. A pumpkin is ripe when the skin turns a deep, solid orange and the stem hardens. Further, when you thump the pumpkin with a finger, the rind will feel hard and sound hollow. Leave an inch or two of stem on pumpkins when harvesting to slow decay. Cut off the vine with a sharp knife or pruners.
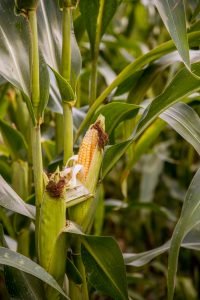
5: Sweet Corn
There’s something pretty perfect about growing your own homegrown sweet corn. Some swear by having a pot of water on the boil so you can literally go from harvesting to pot to table in mere minutes. Harvesting sweet corn is one of the best parts of growing corn. Picking the cobs and excitedly peeling back the sheath to see the full, golden kernels is nearly magical. And corn’s lofty height and feathery tassels make it an attractive plant in its own right.
Sweet corn likes a spot that receives plenty of sunshine in soil that has been enriched with plenty of well-rotted organic matter like compost. While seeds can be sown directly outside, the safest way to sow is to start your sweet corn in pots. Sow 8-10 seeds half an inch deep into 4 inch wide pots. You can use a general-purpose or seed-starting potting mix. Keep the pots moist as the corn plants grow. Ideally, they should be 15cm tall by the time you’re ready to plant them outside. Harden your plants by leaving them outside for increasingly longer spells of time over the course of a week.
Set your plants out in a block for the highest chance of success. Remove your young plants from their pots, then carefully tease their roots apart. Try to retain as much of the soil around the roots as possible. Plant your sweet corn about 18 inches apart in both directions. Dig a hole for each plant and feed the roots to the bottom of the hole then firm the soil back in. sweetcorn is sturdy and shouldn’t need supporting. It will appreciate watering in very dry weather, especially as the silks appear and the cobs begin to form.
The sweetcorn cobs are ready to pick when the tassels at the end turn dark brown, which is usually around six weeks after first appearing. If you’re unsure whether a cob is ready to be picked, gently peel back the top of the protective sheath, then sink a fingernail into a kernel. Is the kernel exuding a creamy liquid? Then it’s ready to harvest. If it’s not quite ready, the liquid will still be watery and if there’s no liquid at all, the cob is way past harvesting.
To harvest, twist the cob and pull it away. Aim to enjoy your harvest sweetcorn as soon as possible.
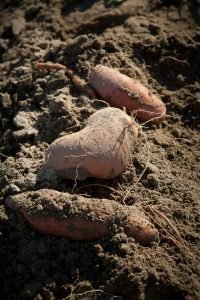
6: Sweet Potato
Like potatoes, there’s no denying the versatility of the sweet potato. And whether it is grown on a trellis, in a garden, or a container, the sweet potato is a beautiful plant or any garden. Sweet potatoes are also a fantastic addition to your diet as they’re loaded with minerals, vitamins, and fibre that are perfect for your mind and body.
Sweet potatoes do best in sunny areas, though they do thrive in other areas of your outdoor space. You can even use them as temporary ground cover or even use them as a trailing houseplant. And, as a balcony plant, it will form a gorgeous foliage plant that you can harvest roots from. Sweet potatoes grow worldwide, from tropical to temperate climates.
Sweet potato will grow in poor soil but you might find your plant roots become deformed in heavy clay or are long and stringy in sandy dirt. For the perfect environment for sweet potatoes, create long, wide 10 inch high ridges about 3 ½ feet apart. One 10 foot row will produce 8-10 pounds of potatoes. Work plenty of compost, avoiding any nitrogen-rich fertilisers as this will produce lush vines but stunted potatoes. Cover the raised rows with black plastic to keep the soil warm and promote strong growth.
It is best to plant your plants as root sprouts, also known as slips, which are available from nurseries and mail-order suppliers. You can then save a few roots from your crop for planting next year.
About 6 weeks before it is time to plant sweet potatoes outdoors, place the roots in a box of sand, sawdust, or chopped leaves in a warm spot. Shoots will sprout and when they reach around 6 to 9 inches long, cut them off at the root. Remove and dispose of the bottom inch from each slip as this portion can harbour disease.
Sweet potatoes mature 90-170 days after planting. Plant in full sun in holes 6 inches deep and 12 inches apart. Bury slips up to the top leaves and press the soil down gently but firmly and water well. If you are not using black plastic, mulch the vines 2 weeks after planting to smother weeds, conserve moisture, and keep the soil loose for root development. Lift longer vines to keep them from rooting at the joints. If you don’t do this, the vines will put energy into forming many, undersized tubers at the rooted areas, rather than ripening the main crop at the base plant. If the weather is dry, provide an inch of water a week until 2 weeks before harvesting, then let the soil dry out. Don’t overwater or the plants may rot.
Harvest sweet potatoes as soon as the leaves start to yellow but the longer the crop is left in the ground, the higher the yield and vitamin content. But if the vines begin to blacken, the tubers can rot. Harvest using s spading fork to dig up the potatoes on a sunny day when the soil is dry. Remember that potatoes can grow a foot or more from the plant and any nicks on their tender skins will encourage spoilage. Dry potatoes in the sun for several hours then move them to a well-ventilated spot and keep warm at 30-32C for 10-15 days. After they are cured, store at 12C, with a humidity of 75-80%. Properly cured and stored sweet potatoes will keep for several months.
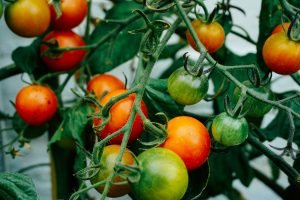
7: Tomatoes
There’s nothing like a ripe tomato, straight from the garden. These fruits not only taste great but are easy to grow. They grow in a wide variety of conditions, and they don’t require a lot of space. And there is an incredible choice of varieties based on your tastes and hardiness zones. The most common varieties of tomatoes include:
- Cherry
- Roma
- Beefsteak
- Long Keepers
These are the easiest tomatoes to grow and they all mature quite early. Cherry tomatoes, especially, are small, bite-sized snacks that are a big hit with children because they can quickly grow and eat their own tomatoes. If you want a larger tomato, Roma and Beefsteak (or Big Daddy) are ideal for sandwiches as well as salads. Yellow and orange tomatoes, known as Long Keepers, can be stored for several months, as long as the area is cool and dark.
For the best tomatoes, the soil should consist of organic matter, usually compost, with sufficient amounts of fertiliser and moisture. You should start early as most large tomatoes take a while to mature. If you’ve never grown tomatoes from seeds, we recommend starting by purchasing the plants themselves. You can find these at most garden centres, including Aumanns. Unlike plants, seeds, normally take 6-8 weeks of growing and must be hardened off before they are transplanted into the garden. They can be started in a window box or small flats and then transplanted into smaller pots or paper cups with adequate drainage holes – or other containers – once the seedlings have become sturdy enough. Thin the seedlings as needed and pinch the tops to create strong, stockier plants.
The planting distance for tomatoes differs depending on the variety. But all tomatoes require full sun and should have adequate protection from strong winds. Once your tomato plants are sturdy enough, you should stake them for further support. This also makes harvesting easier, ensuring the fruits are easy to reach and are kept off the ground/soil.
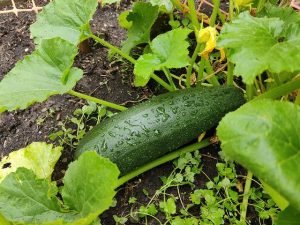
8: Zucchini
Perfect for the beginner gardener, zucchinis are quick and easy to grow. Zucchinis prefer full, regular watering, and well-drained soil. They grow well in all climates and are ready for harvesting 6-8 weeks after planting.
When growing zucchinis in the garden, ensure you have well-drained soil mixed with a good soil improver and plant fertiliser. Sow 3-4 seeds into mounds of moist soil spaced at least 40cm apart. Water well and, as seedlings grow, thin them out leaving only the 2 strongest. Much around the base of the plants with organic mulch like sugar cane or pea straw. Harvest zucchini when the fruit is small and tender for the best flavour. This will also encourage more fruiting.
Zucchinis do best in the garden but they will still grow well in pots. Choose varieties that are more compact growing. Choose a trough or pot around 40cm wide and deep. Position the containers in full sun but where they will be protected from strong winds. Use a high-quality potting mix with a lifter. Sow the seeds, cover lightly, and water well. Again, as the seedlings grow, thin them out and leave only the strongest. Ensure you feed the seedlings weekly with a vegetable and herb liquid plant food. As before, harvest when the zucchinis are small and tender for the best flavour. Pick regularly to encourage the plants to keep producing zucchini.
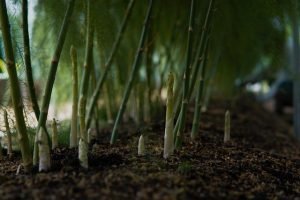
9: Asparagus
Asparagus is fantastic and versatile green that is rich in B vitamins, vitamin C, calcium, and iron. This makes them the perfect addition to any meal. While it might seem like a difficult vegetable to grow it is actually a great starting point as it is one of the few perennial vegetables that grow fresh spears year after year with little effort. While it takes asparagus plants 3 years to mature, it is absolutely worth it when you have a bounty of nutritious greens at your disposal.
It may take time to start your asparagus patch from seed, but there are advantages to gain from the wait. Growing asparagus from seed won’t suffer from transplant trauma like nursery grown plants and, often, a whole packet of seeds will come out to the same price as an asparagus crown. And most seed-grown plants will outproduce those started from the roots anyway. Sow seedlings into pots made from newspaper. Place these pots in a sunny window and use bottom heat to maintain the temperature around 25C. when they sprout, lower the temperature and then plant the seedlings once they are about a foot tall, 2-3 inches deep into a nursery bed of soil.
When your plant starts blossoming tiny white flowers, observe them with a magnifying glass. Female flowers have well-developed, three-lobed pistils. Further, male blossoms are larger and longer than female flowers. Make sure you weed out all the female plants and, in the following season, plant the male plants in a permanent bed.
It is important to select an asparagus bed with care as your crop will occupy this spot for 20 years or as long as you let it. Asparagus tolerates some shade but will produce a better crop with fewer diseases in full sun. Prepare the planting bed – a simple raised bed works fine – about 4 feet wide. Remove perennial weeds and roots, and dig up my aged compost or manure.
Starting asparagus from a crown will give you a year’s head start over seed-grown plants. They will need to be wrapped in slightly damp sphagnum moss until you are ready to plant. To plant asparagus crowns, dig trenches 12 inches wide and 6 inches deep down the centre of the prepared bed. Soak the crowns in compost tea for 20 minutes before planting. Place the crowns in the trenches, 1 ½ to 2 feet apart, and top them with 2-3 inches of soil. At least 2weeks later, add another inch or 2 of soil. Continue adding soil periodically until it is slightly mounded above the surface level for settling.
Water asparagus regularly during the first 2 years after planting. As the asparagus matures, it will crowd out most weeds. Fertilise in spring and autumn with a top dressing liquid fertiliser.
Don’t harvest asparagus during the first 2 years that the plants are in their permanent bed because they need to put energy into establishing deep roots. During the third growing season, pick the spears over a 4 week period and by the 4th year, extend your harvest to eight weeks. Cut asparagus with a sharp knife or snap off the spears at, or right below, ground level with your fingers.
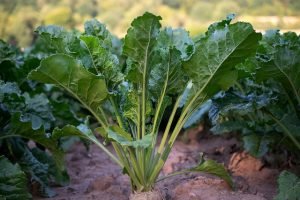
10: Turnips
Turnips are a great, old fashioned vegetable and it is finally getting the revival it deserves., while it was once considered bland and boring, now that we know how best to cook it, turnip is an incredibly flavourful vegetable. Turnips prefer full sun and regular watering in well-drained soil. You can harvest turnips at 6-12 weeks after planting, depending on the variety.
When growing in a garden, choose a sunny spot with well-drained soil. Loosen the soil and enrich with a soil improver and plant fertiliser. Sow seeds direct into the growing position, cover lightly with a seed raising mix, and water well. As seedlings grow, thin out weak plants and feed a vegetable or herb liquid food. Water regularly, especially in hot or windy weather. Mulch with organic mulch like sugar cane or sweet pea to retain moisture. Harvest when turnips are about 10 cm wide and still young and tender.
When growing turnips in a pot, choose one that is at least 40cm and the same deep. Position in full sun and fill with a high-quality potting mix. Sow seeds and lightly cover, watering well. As the seedlings grow, once again you need to thin out and feed weekly with a vegetable and herb liquid plant fertiliser. Water regularly and harvest the turnips when they’re young and tender. Ensure you harvest before your plants begin flowering. This will turn the turnips fibrous and inedible.
You need to avoid planting turnips in the same spot as broccoli or cabbage as these plants are in the same family as turnips. Otherwise, you risk a rise in soil-borne diseases.
Looking to start planting for winter? Explore the range of winter vegetables at Aumman’s Nursery and Garden Supplies. Our expert staff can help you get your winter garden started today!